

The workstation I use
This article’s topic isn’t totally new – in fact, it has been almost 1.5 years ago that I build myself a new computer. But I think it might still be relevant and interesting to some of you who think about getting a new machine and look for tips and ideas on how to plan and execute such a project.
I’m going to keep it as short and concise as possible. If you should want to get more information and actually see me assembling the computer, you can find a series of videos at the end of this article which provide more detailed information. If you happen to have any other questions, feel free to leave a comment down below and I’d be happy to answer you as good as I can.
I’m going to split this article in sections. In the beginning I’m going to talk about the thoughts that went into planning my system. The second part talks a bit about assembling everything – but I’m not going to talk about it very long as there’s a ton of instructional videos out there that can teach you the details. In the last part I’m going to talk about my experience with this setup and also a bit about the software I use and why I use it. So let’s get to it!
First thoughts
When ever you want to build a computer from scratch, it is essential to know what you will be using it for. In my case I needed a workstation that had enough power to cope with music production, video editing and photo retouching. It had to have enough disk space and I wanted it to be silent since I use it in the studio for recording. And one last thing I had in mind was to make it the best computer I could get for the best price I could get it for.
Back to the tasks I wanted to use it for: in music production you basically need fast hard drives, lots of RAM and a good audio interface (which I already had). For video editing you need a fast processor and decent main board to handle the full HD streams, a good GFX card with a good amount of RAM, loads of RAM for post processing and also a fast hard drive. For photo retouching you need RAM and a fast hard drive . With that said, it was kind of easy to come up with a solution. I basically needed lots of hard drives – preferably SSD’s or really fast HDD’s, a fast processor, fast and big RAM, a great GFX card, a power supply that was quiet and powerful enough to back it all up, silent case fans and a good case with noise padding. With this list on hand, I went shopping around the internet and after weeks and weeks of comparing, watching videos on Youtube about all the best parts to get and also comparing prices, I started ordering the stuff.
I’m going to keep it as short and concise as possible. If you should want to get more information and actually see me assembling the computer, you can find a series of videos at the end of this article which provide more detailed information. If you happen to have any other questions, feel free to leave a comment down below and I’d be happy to answer you as good as I can.
I’m going to split this article in sections. In the beginning I’m going to talk about the thoughts that went into planning my system. The second part talks a bit about assembling everything – but I’m not going to talk about it very long as there’s a ton of instructional videos out there that can teach you the details. In the last part I’m going to talk about my experience with this setup and also a bit about the software I use and why I use it. So let’s get to it!
Assembling the parts
As I said, I’m not going into the details about how to put everything together here. The videos below explains that. I just assume that everyone who plans on putting together a system from scratch, already has some experience on how to do it. Just make sure to handle the components with care especially the processor, the RAM and the motherboard. It was my first built too, but I knew all the basics on how to exchange parts and the rest isn’t that hard to learn. If you’re a bit frightened to damage anything during the process, don’t be. Most of the parts aren’t as delicate as you might think. For further information on how to do something like that, visit Linus Sebastian on Youtube and watch some of his videos. He is amazing explaining everything.
After you’re done putting everything together, it’s time to setup the system and get it running nice and smooth. I use Windows 7 since all the studio software I got works best with it and to be honest, I think it’s much easier to setup a Windows based system than an Apple one. Maybe that’s not true but I don’t have any experience on Mac and so I can just say what I heard from people.
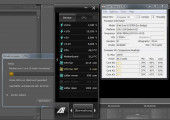
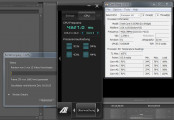
I spent the first couple of days on tweaking every little parameter such as fan settings, overclocking the CPU (yes – I did overclock it to approximately 4.2 GHz but that’s not a problem with the processor I got and pretty easy using the motherboard’s tools), setting up the bios settings and so on. Here are some readouts of my system (my system runs in German language).
As I said, I’m not going into the details about how to put everything together here. The videos below explains that. I just assume that everyone who plans on putting together a system from scratch, already has some experience on how to do it. Just make sure to handle the components with care especially the processor, the RAM and the motherboard. It was my first built too, but I knew all the basics on how to exchange parts and the rest isn’t that hard to learn. If you’re a bit frightened to damage anything during the process, don’t be. Most of the parts aren’t as delicate as you might think. For further information on how to do something like that, visit Linus Sebastian on Youtube and watch some of his videos. He is amazing explaining everything.
After you’re done putting everything together, it’s time to setup the system and get it running nice and smooth. I use Windows 7 since all the studio software I got works best with it and to be honest, I think it’s much easier to setup a Windows based system than an Apple one. Maybe that’s not true but I don’t have any experience on Mac and so I can just say what I heard from people.
I spent the first couple of days on tweaking every little parameter such as fan settings, overclocking the CPU (yes – I did overclock it to approximately 4.2 GHz but that’s not a problem with the processor I got and pretty easy using the motherboard’s tools), setting up the bios settings and so on. On the right you can see some readouts of my system (my system runs in German language).
I had to make sure the core temperatures were all right, that the GFX card ran at it’s best and that everything was stable when running high performance tasks such as rendering video or using many VSTi plugins at once in the studio environment. After I was sure that everything was fine, I installed the rest of the applications and made a backup of the system.
Experiences & Software
After 1,5 years of using the system without doing any major changes to it (I just added hard drives), I must say that I am still pretty happy about its performance. It runs smooth, it boots up quickly, rendering video has become such a joy compared to my old computer and working in Photoshop, Lightroom, Premiere, After Effects, Cubase and all the other applications is just awesome. It is responsive due to the use of SSD’s, it’s fast because of the GFX power it’s got (the new Call Of Duty set to full res in everything doesn’t seem to bother the graphics card at all) and it performs great when using Photoshop filters or editing video in Premiere.
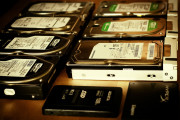
If you’re a photographer as well, make sure to get enough disk space. As drives get cheaper and cheaper, there’s no excuse for not exchanging them on a regular basis. In my system I’m currently running a total of 11 drives giving me a total of approximately 10.5 TB (!) of disk space and to be honest – I’m running out of space again. RAW files get bigger, video files get bigger as you go to full HD or 4K editing and since I’m not deleting anything from my shoots, I came up with my own organisation of backing up things using external drives (USB3) and a hotbay for SATA drives. I also got an Icy Dock (look it up on Amazon) that holds up to 4 drives and makes it easy to swap out drives.
Last but not least you maybe want to know about how much I paid. Well – the computer with all its components plus a full HD LED display came in for around 1000$ (900 €) but I’m sure the parts might be cheaper now or you might get better parts for that money. Just make sure to compare prices all around the internet – it will definitely save you a lot of money not getting everything from one dealer.
I hope this article helped you a bit. If you have any questions, let me know!
Parts List
Processor:
Intel i5-3570K processor with 3.4 GHz
Mainboard:
Asus P8Z77-V
RAM:
Corsair DDR3 RAM 667 MHz (16GB)
Harddrives:
Kingston SH103S3240G SSD 225GB
Samsung 840 EVO SSD 250GB
Adata SP900 SSD 128GB
Samsung HD103SI HDD 1TB
Cooling:
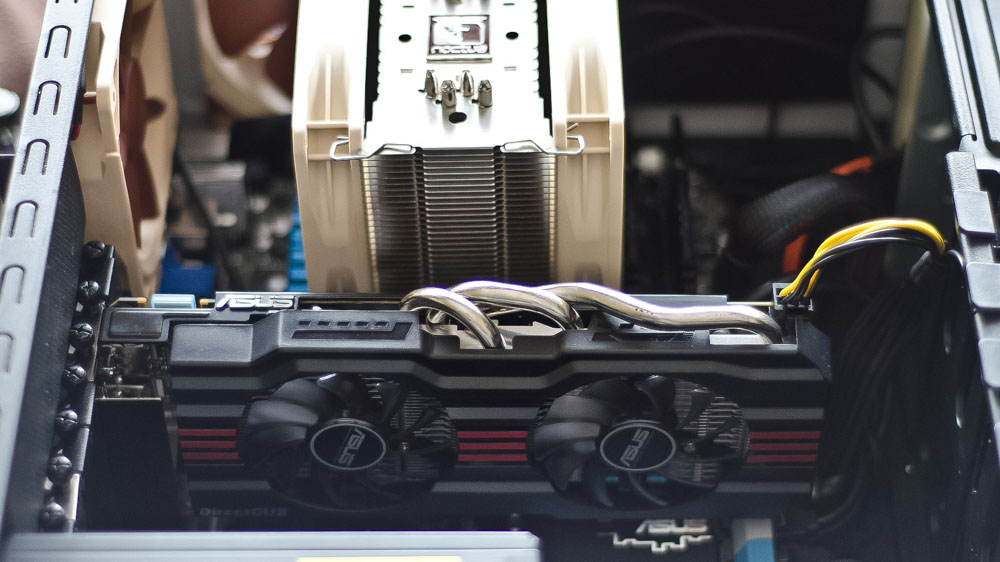
Several Noctua fans 140mm/120mm –
Case:
Coolermaster case with noise padding and quicklock technology
GFX:
NVIDIA GeForce GTX 660 OC 2GB
Readouts

Teile diesen Artikel